[MrDeepfakes guide written by SoDeepFake from 01/06/2023]
We all know that process of making deepfakes is very power consuming, especially if you do this every day. High power draw means higher electricity bills and more heat generated by our system which then leads to higher noise levels generated by fans spinning faster in order to cool our hardware. Fortunately there is solution to our problem.
So basically, what is undervolting and underclocking?
Every GPU manufacturer sets it's hardware to work at certain clock speeds and voltage. The problem is that usually voltages are set way to high because manufacturers have to make sure that every single GPU will work with those values, there is no time for setting it to every single model and testing it if its stable over long period of time. That would make whole process of making GPU's much more expensive so they basically just set it high value that every single GPU will work with those values. Undervolting is manually finding what voltage will work with our specific card. Setting it as low as possible while still working as before (sometimes even better due to higher boost clocks because of lower temps).
Ok, we know what is undervolting, what about underclocking? Core clock and voltage are tied to each other. The higher the clock speed, the higher the voltage. It also works the other way - you can set lower voltages if you want your card to run at lower clock speeds. Underclocking basically means lowering core clock and sacrificing a bit of performance to be able to set even lower voltages and save a lot of power that way.
Ok, so is it even worth it?
Here is my example. I'm using Ryzen 7 2700 CPU and RTX3080 10GB Auros Xtreme GPU. I'm training a 320res DF-UD model, running LRD and GAN at the moment and here is my power draw. On the left you can see power draw of my system running at stock clocks and voltages, and on the right with underclocking and undervolting my GPU. 390W compared to 260W, that is huge difference. You will definitely see it on your electricy bills. Your GPU will also run hotter and fans will spin faster in order to cool it off so you will definitely notice this as well.
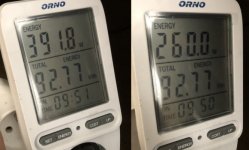
Ok, so we already lowered our power draw by a lot, but how's the performance? Actually not that bad. Before, our iteration time was at 562ms and now it's at 594ms so basically our power draw went down by around 33,7% and iteration time went up only by 5,7%!
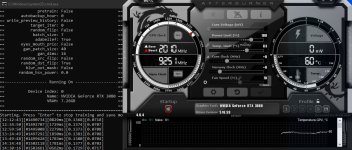
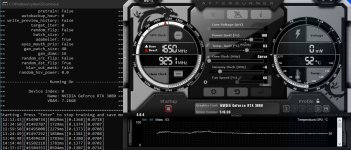
So how do you do undervolting and underclocking?
Well, that's actually really simple. First, you need to download and install MSI Afterburner. Yours may look a bit different than mine, it's just the skin so it doesn't matter but if you want to see exactly what I see go to settings > user interface and change skin to "MSI cyborg afterburner White by Derex Design" and apply.
If you already have afterburner running press "left CTRL + F", window will pop out where you can manually set voltages. Scale on the left is your core clock, on the bottom voltage im mV.
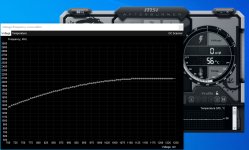
In this window we will be setting our voltage and clock speed. To do so, hold left shift and hold one dot on the chart with your mouse and drag it down so whole line is below frequency that your gonna use (don't do it yet, just keep reading). It should look something like this:
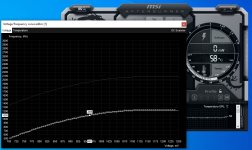
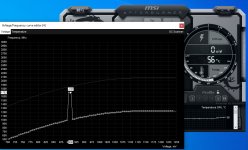
Now, release shift and left mouse button, pick a point that corresponds to voltage that you want to use (I will help you pick right one later) and just drag it up to the frequency that you want to use with that voltage. Next, do the same with point on the right and drag it up to the same frequency level. I decided to use 1703MHz with 900mV as an exmple so you can see how it should look. After you did that just apply it on the main window in afterburner.

That's how it works, but how can you know what frequency and voltage you should choose? First, you should know what's your GPU stock clock speed and voltage. You can check that in software called HWMonitor. My GPU at stock boosts to around 2055MHz with 1.063V. Just start your regular training and check your values as shown below:
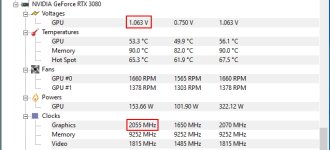
Now we want to pick lower frequency. I personally would go as low as I can, as I showed you on my example setting freq to as low as 1650MHz allowed me to run my GPU at just 750mV (instead of 1063mV stock) and I lost only 5,7% performance. You can actually check different frequencies before changing a voltage to see what performance you will get. You will see that lowering frequency more and more will make you loose just a tiny bit of performance, but at certain point you can see a bigger drop where it's not worth that much anymore. In my example 1650MHz works perfectly fine, but when I try 1600MHz I can see bigger drop in performance while there is not much of a drop in terms in power draw so it's not worth going that low anymore.
So how do you check different frequencies and performance you can get running them? If we know that my card runs perfectly fine @2055MHz and 1.063V then we can be sure that it will run perfectly fine at lower frequencies with the same voltage. Now we can start testing: press left CTRL + F as shown before while MSI Afterburner is open, Press shift and drag whole chart below frequency that you're gonna test. Pick a point that corresponds to the voltage that your card is running stock, for me this would be around 1.063V and drag it up till you hit frequency that you want to check, for example 1900MHz in my case. Now drag the point on the right to the exact same freq level so it is in line with previous one. Hit apply on main screen and check how iteration time changes. Now restore your setting with button with arrow and do the same with lower freq, for example 1850MHz. I had RTX 3060, 3070 and now have 3080 and in my experience 1700MHz was a sweet spot fot those cards so you might want to check that to.
Ok, so you did some testing, and for example it seems like 1700MHz makes you lose just a bit of performace and going below that point you can see that iteration time goes up more then it was going between previous tests so you want to stick with that freq. Now we just need to check how low can we drop voltage to make GPU work perfectly stable at that clock.
Restore your settings and repeat whole process, this time instead of picking around 1.063V pick lower value. If you lowered your freq quite a bit (like I did) you could go straight to low voltages like 800-900mV but I would recommend you not to rush and just keep testing lowering it by -25mV. So make sure you are training a model in DFL, L Ctrl+F in MSI afterburner, drop chart below and drag a dot corresponding to 1000mV to 1700MHz, make sure to do the same with the dot on the right, just drag it up to 1700MHz too (remember, that's just an example on my card, your values might be different). How do you know if it's ok? Well, if DFL keeps training, it doesn't crash etc then it's ok. Keep training for a minute more, if it's fine restore settings and repeat for 975mV, 950mV, 925mV etc. At some point you will see that DFL will stop working or crash and that means that your GPU isn't stable anymore at that freq and voltage combo.
So what should you do when DFL crashes? Let's say you were running 825mV perfectly fine, but when you switched to 800mV it crashed. You need to restart your settings in MSI Afterburner and set it back to last stable position which was 825mV in our example. I personally use my PC for other, normal stuff while I'm training my models so I've noticed that even if our lowest stable value was 825mV running just DFL it could still crash later on while we start watching youtube, browsing web etc. In my experience the best way to test if it's really stable while using PC and training model at the same time is to run DFL and open a few twitch streams in our browser. If you keep watching and DFL still works fine then you might want to add just a little bit of voltage to make sure it will work stable. So in this case I would set it to something like 840mV.
Now just keep using your PC like you would normally do and train your model. If it was fine for a few hours or a day you need to open MSI Afterburner and check windows logo on the left to make sure that your GPU will work with your setting at startup.
And that's it. You might be concerned if it's really safe and yes, it is safe. We're not increasing the voltage so you can't really damage your hardware, actually lifespan of your GPU should be higher.
If you have some questions just let me know in the comments.
TMBDF Comment:
There is one mistake I've noticed, the way you calculated the difference in iteration times isn't quite correct, if you could please fix this by doing following:
Start up pc, wait 15 minutes, measure temperature in the room, start training model and let it train for full 2 hours, measure how many iterations it did.
Stop training, turn off PC, let it cool of, start it up again, wait 15 minutes, start training again, this time undervolted/underclocked, also 2 hours, same model, start from the same point (don't continue training, train always from the same amount of iterations), measure iterations done in 2 hours. Then you will know exactly what the difference is
The times can differ a lot on every run, only by averaging thousands of iterations over the course of more than 1 hour you can actually get decently accurate results, ideally you'd run the test two times but even doing it once for 2 hours should be much precise than comparing the random iteration time readouts you get which can sometimes differ wildely from each other, even though model seems to be doing the same thing (remember this is deep learning, the math behind can seem quite random, it can affect results a lot over short period of time as it does results, you never get the same results from DFL twice, even if you train something exactly the same on the same hardware).
Also just because something seems stable now doesn't mean it actually it, you may end up training just fine for weeks just for it to then crash seemingly randomly but actually because it's not quite stable, I'd say 48 hours straight with no crash is good enough for most but I've had overclocks (and underclocks) run fine for like a week and then crash because I've started up some app which put slightly different load on GPU and made it unstable which you did mention but you didn't mention that one should actually test it for that long, I recommend using DFL with browser open playing videos and also open MVE with some dataset loaded and maybe also few other apps like visipics and XNViewMP (the thing DFL comes with to browse images), that seems to put most "usual", load that is most likely to crash it and then have it train for 48 hours while playing around with MVE (applying labels to faces).

